Showing posts with label Home. Show all posts

Thursday, March 28, 2013

It's the Little Things that Make a Difference!

The weather has been warming up a little this week so it was a great time to open up the windows in our bedroom and do a little trim painting.  The trim was a creamy white (which I painted a couple years ago) but with the new wall color it looked kind of dirty and drab.  I decided to brighten it up a bit with the same white paint that we used on our kitchen cabinets and on the molding/trim in Eli's new big boy room. It's called Decorators White by Benjamin Moore. 

Before color is to the left, new trim color is to the right.
                                              Before...                                            After...

  Windows and baseboards received some love as well.

Now that the wall color, trim, windows and doors are painted we can put our furniture back together in the room and put up our new light fixture.  I had been eyeing one at Lowe's and finally caved this week.  Post to come once its up and room is semi finished.  The hubby still needs to change out the electrical to white to match the room.  We are slowly but surely changing all the electrical in the house from cream to white.  Next up we have hopes of trying to build/make our own fabric headboard.  Will keep you posted! 

Trim is the most tedious of painting jobs, but sure does make a difference in the big scheme of things.  Any of you out there have a favorite trim color?  There are so many whites to choose from that it can be confusing.  I brought home several swatches and held them up in the light next to each other.  They all have a totally different color undertone.  I like the Decorators White because it has a gray undertone which flows with the other colors going on in the house.   And of course you don't have to just go with white.  We have a green trim color in our living room with cream walls. That may get changed out eventually but for now, it's staying :)  

Monday, March 25, 2013

Monday Makeover: Part 1- Master Bedroom paint is on the "Horizon"

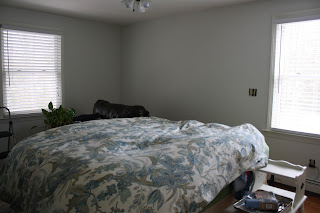
As I said in the last post we were hoping to tackle our bedroom this past weekend with a paint change up.  Thanks to my husband's drive and ambition this task is pretty much complete and the bedroom makeover is finally underway.  When we bought our home almost 3 years ago (this May), I picked a paint color that I thought flowed with our duvet cover.  It was a neutral tan called "Earthy Cane" which I really liked but in our room it just never seemed to fit right.  It always felt dark and blah every time I walked into the room and that's exactly what I don't want to feel when I walk into my bedroom.  I want this to be a space where I can create an oasis that gives me room to relax, shut the door and take a little breather from the business of life.  I want it to have a bright airy feel with a little romantic flare but not too feminine since of course the hubs shares the space as well :)  I struggled with picking the right paint color this time.  I knew I wanted a light color, almost white with a grayish tint.  I had a few picked out and finally decided on Benjamin Moore's  "Horizon".  It is a light silvery/gray color with undertones of blue. Of course I didn't buy the Benjamin Moore paint because I didn't want to spend that much, but instead I brought the color to Lowe's and had them color match it in Valspar's 2 in 1 No VOC-Low Odor paint.  I was SO IMPRESSED with the coverage of the paint and plan to use it in the nursery for our next project.

When I envision this room I see white airy curtains, a crystal chandelier of some sorts, linen fabric headboard  with a small sunburst mirror over it, and a large rug to help ground the room and complete the warmth of the space.  I have an old vintage desk that my dad gifted me and side tables that I bought at the Goodwill last year that I plan to refinish.  But before moving forward with all the decor and fun stuff, here is the foundation and basis of our room, the walls.  I think if the walls could talk they are a lot happier as am I.  We slept in the nursery/guest room last night since the fumes were strong but when I walked into the room this morning I was very pleased with the result.  I'm not a fan of it with the bright lights on at night because it changes the look, but in the daylight its exactly what I envisioned.  I plan to put soft lighting in when we change out the lighting.  It's amazing how the right lighting can change the whole atmosphere and mood!

Here is the process of our painting party weekend:

 BEFORE Color in "Earthy Cane" and AFTER in "Horizon"
 
BEFORE...

 The journey of the process...
           
Removed all the outlet covers and trimmed out the entire room first.


First coat is going up...looks white in this picture still.

The hubs rolled the paint while I trimmed.  He is amazing and am so thankful he will help tackle projects with me. We work well as a team.  I'm the detail perfectionist and Nate is the bulldozer and motivator that keeps me going and gets the job done efficiently.  
  
2nd and last coat is up!  Planning to repaint trim "Decorators White" like in Eli's room so it's a little brighter white.


Choosing a paint color can be intimidating and scary, but don't let it keep you from taking a risk and diving in.  To be honest, I'm repainting almost every room in our house that we painted almost 3 years ago because after living in the home, I realize what I really like and what I want to live with long term.  When we moved in, I was picking colors in a flurry so we could get our things settled.  I would advise new home owners not to rush too quickly in painting your rooms because your perspective and liking can change once you live life in a space.  The great thing about paint is that it can be changed easily so you are never locked into it.  Keep in mind the lighting in a room when picking your paint color because that can completely alter the look.  I have had paint swatches hanging along our door frames for a while now so I could think about what I really envisioned and wanted.  And of course, you can always pay a few dollars for paint samples if you need to see larger samples side by side to make your final decision.  If anyone out there is questioning a color or needs help picking one, shoot me an email and maybe I can help brainstorm with you :)  I will be back soon with the next step in the process of the master bedroom makeover!  

As we head into our week leading up to Good Friday and Easter/Resurrection Sunday, may we all  be reminded to fix our minds and hearts on the sober reality of what this time and season represents.  My prayer is that we would all be opened up to new "Horizons" as we set our eyes on Jesus, the source of true life and the answer to all our needs!  

Happy Monday!

Monday, February 11, 2013

Getting My Organization On...

So today is another snowy day and I decided not to venture out on the roads.  Eli and I have had a pajama day and I thought it would be a good time to take advantage of doing a little organization in the basement, pantry, refrigerator, and junk drawer.  I reorganized mine and Eli's closet the other night so I think that jump started me on wanting to get more in order elsewhere.   Organization used to be more of a strong suit for me but when life gets busy things often get misplaced and it soon looks like chaos.  If I have a place designated for certain things then when I go to put them away it makes it easier to keep it more in order, otherwise, things just get piled on top of one another and then I'm swamped.  This gives you a good idea that my house is so far from being perfect and it's just like anyone else's.  I do love when my house feels organized though because it makes my life feel so much better in every area.  It's truly amazing how it can effect the mood of your entire life!  With that said, today I got my organization on and hoping to tackle more as the week goes on!

First up on the agenda was the basement.  It was in total disarray and I wanted to tackle the storage section of the basement where all our totes and boxes are stored.  There were totes opened and off the shelves everywhere from trying to find things.  I had miscellaneous items laying around waiting to be either stored in a tote or put in a Goodwill box.  The basement still needs more functional shelving and I need more totes to make it feel more "orderly", but for now I'm feeling so much better after what I accomplished this morning. In the future here soon, Nate has plans to build wood shelving down there and buy more totes and label everything so it feels more uniformed and easy to find everything.  Post to follow once we get to that step!
Before...
 After...
 Before...
 After...

Next up on the agenda was my small little pantry.  I would LOVE a walk in pantry closet someday but for now I am thankful for what I have.  This too needs some revamping in the future as well.  We have wire shelving which is started to warp in the middle because of the weight of the goods that are stocked on the shelves through the years.  Hoping to remove those and replace with real wood shelves to make it once again more functional.  I went to the dollar store recently and found small plastic totes with the chevron pattern on them.  They had other ones with different geometric shapes as well that were very cool and modern looking.  I knew immediately that I wanted them for some sort of organization in the house.  When I was glancing at the pantry this week I realized that's where they belong. I spent a total of $5 on these plastic boxes and it gave the pantry a nice face lift.  I also found some other containers laying around (2 from Ikea) and a glass jar that wasn't being used as well as some canning jars to help organize the food and give it a more aesthetic appeal :)  The bottom of the closet is where we put our recyclables which should be picked up tomorrow. Here is before and afters...
Before...
 After...
 Close-up of the boxes and containers I used.
 Very top shelf is where we store water pitchers, popcorn maker and things that we don't use that frequently since it is hard to reach.  Second shelf down is this one below.  To the left we have extra pantry items on hand in the back in case we run out.  We often buy in bulk at Sam's so we store some of the extra here or in our jelly cabinet.  The plastic box is our treat box with something for the sweet tooth and gum.  I have some of my canned tomatoes (that I canned this summer) sitting on the shelf along with my rice and pasta that I have stored in canning jars as well.  I usually keep my oil over by my baking area but the bottle is too tall for my cupboards so it stays in the closet.  I need to get a smaller glass bottle to transfer the oil over and keep it with the rest of my baking items.
 Third shelf down is home to some of our snacks and cereal.  We always have cheeze-itz and animal crackers on hand.  The other tall container has cereal in it and it's great for that.  I purchased those at Ikea this past year.  In the box is granola and rice krispies that I use for making granola bars.
 Bottom shelf is our snack area.  Eli likes to help pick out a snack so I put this one at his level.  One of the boxes has nuts/dried fruit, one has chips (we always have tortilla chips in our house since chips, salsa and avocado is a favorite here) and the other box houses miscellaneous snacks.

Next up was our junk drawer.  I had bought an organizer at Ikea this past year as well as another dollar store bin so this drawer looked neat and orderly months and months ago, but again it became mass confusion after a while.  The plastic bin that I used in this drawer has several compartments which is nice to split things up.  One compartment houses tools such as screwdrivers, pliers, measuring tape and flashlight that we like to have accessible.  Another compartment has cords to our computers and phones in it.  Some of the smaller compartments have extra batteries, paint swatches, sticky notes, etc.  In the bin to the right I have pens, extra paper, coupons and menus to local restaurants that we like to have available.  In the back in my address book and stamps.  Everyone needs a junk drawer for those small miscellaneous things that need a home...I just like to have one that has some sort of order to it so when I'm looking for something I know where it is at a quick glance.  Here is the drawer...
Before...
 After...

 Lastly, the refrigerator got some love but I didn't document it with pictures.  Nothing too exciting happened here, but it does feel clean and more organized. I like to do this every time before I go grocery shopping so when I come home with groceries I can put them right away without fighting for a place to put them.  Anyone else have any handy tips on organization?  Or have recommendations for organizational tools.  I find that the dollar store has an abundant of tools for smaller spaces/closets.  Enjoy the rest of your day and thanks for stopping by!

Friday, February 8, 2013

Our Busy Snow Day: Bunks & Shelving!

Today was crazy outside.  Snow storm "Nemo" arrived early this morning and didn't let up much all day.  The brunt of the storm has yet to hit and should be striking here in a few hours.  I haven't seen this much snow at once as long as I can remember!  Eli is looking forward to getting out and playing in it.  I have a feeling that it may be a part of our agenda tomorrow :)  Since we were staying in for the day, we decided...why not tackle a couple projects?  And that's exactly what we did.  I re-painted a standing shelf and the hubby and I put Eli's new bed together so we could start putting the finishing touches on the room.  Of course, no project is complete without our little tag along who likes to help with EVERYTHING.  That is no exaggeration.  Whenever we have something to do or work on, he is our little shadow and on our heels the whole time.  He gets his tool box out, or uses Nate's tools and he truly thinks he's working.  The look of seriousness and accomplishment on his face is priceless and our level of patience is tested to the max, haha!  Hopefully this excitement and ambition lasts in the future!

Here is a sneak peak at the shelf I tackled today.  It was a hand me down from my dad who found it on a moving job years ago.  I inherited it when we married and it has moved from room to room throughout the last 4 1/2 years.  It recently has been chilling out in the playroom, but I decided to give it a new life and new home in Eli's room. 

First photo is the new color.  It is the same blue that is in Eli's room on the walls..."Hale Navy" Benjamin Moore.  The picture to the right is what it has looked like for many years...a creamy white color.  The blue color doesn't do justice in the lighting of the basement but will post more pics to come when we do Eli's full room reveal.  It took 3 coats to get the color that I was looking for.  It pops against the white board and batten in the room.  Can't wait to show!

We had a change of plans in the bed department for Eli's room.  We originally had planned on converting Eli's crib into a full size bed.  When we ordered the conversion rails this past week we found out they were on back order (in the color we needed) until end of April.  We didn't want to wait that long but didn't really
have any other choice because we needed the rails specific to this crib.  A while back we had thrown out the idea of bunk beds in that room in the future.  Since the room is small we thought it would make the most use of the space.  Yet, I didn't want to lose the full bed because of when we have guests over.   When we woke up this morning, Nate brought up the idea again and this time it seemed like our best option.  We would actually probably save money in the long haul and if we have a couple staying over we can sleep in Eli's room with him and our room can convert to the guest room.  Plus we will always have an extra twin bed available in Eli's room for family that stays over more often.  Problem solved!  So my crazy husband faced the storm head on and made a trip to Sam's Club this morning.  I had seen the bunk bed there a few months ago and it was almost the exact replica of one I liked at Pottery Barn but for the fraction of the cost.  It's crazy the difference in price for a piece of furniture that looks almost identical! So, he loaded up the box and mattress and
made it home within an hour of leaving our doorstep.  The color is chestnut and it's real wood which is a huge PLUS! I love how you can see the knots in the wood.  It actually matches our crib in the nursery and Eli's dresser that we bought a couple years ago.  I am in love with the dark wood against the white board and batten molding.We were probably more excited than Eli to unpack the box and get it put together.  Here is a snippet of our day putting it together as a family...


 Here is the almost finished product!  Mattresses and ladder rails to be installed!

We are so very happy with our purchase and it gives Eli a lot more room to play in there now.  When he woke up from his nap in the nursery this afternoon he told us he was ready to go back to bed because he was so excited to sleep in his new bed.  He is sleeping in it tonight and he was beyond thrilled! I am working on some finishing touches and will be back with a full room reveal by Monday.  Anyone out there have bunk beds or contemplating them?  I would recommend our purchase highly because of the price!

Enjoy your weekend and anyone in the pathway of "Nemo" stay safe!!  Speaking of "Nemo"....Eli's fish that he named Nemo made his transition into the new room as well.  He was swimming around happily, like he was giving us his stamp of approval :)


Wednesday, February 6, 2013

Board & Batten Part 3: Officially Finished!

After a long couple days of plugging away at Eli's "Big Boy" room, we are now officially finished to start moving his bed and belongings back into the space.  Before doing so, we are waiting on a bed conversion kit that we purchased this week that will convert his crib into a full size bed.  Once that arrives, we can make the final transition!  Eli and I have been doing the "happy dance" in this wide open empty space.  Not sure which one is excited more!  He keeps going into the room asking when he can move in :)

Now for the meat of this post, here are the finishing touches we did to complete the board and batten.  

1. Nate cut the shelf and trim board to fit the top of the molding.  I primed and painted the shelf before putting it up since I didn't want to have to tape off the wall and it made it much easier.   All I had to do was touch up after he nailed it on.  He made straight cuts at the corners for the shelf.  Underneath the shelf we put up a trim piece to cover the seam of the shelf against the board below it.  This really gave a finished look to the top molding.  Nate had to make angle cuts on the trim piece for the corners of the room.  He You Tubed some videos which helped him figure out how to cut it correctly.  Nate nailed the shelf up first and then glued the trim piece on.  We put painters tape up to hold it while it cured.  We found on the longer walls that we had to put a couple nails in to hold it up in addition to the glue.  Once painted over, you can't even tell!


2.  Painted a second coat on the molding and wall.  I had to do three coats on the trim up top because it was a little streaky underneath with just 2.   Also primed/painted register same color.  This took 3 coats to make it even.

 3.  Nate changed out the electrical from cream to white so it would blend in with the wall.  This took about 30 minutes total.  Inexpensive project that makes a world of difference!  Plates came in a pack, 10 for $2.99 and we already had the white electrical inserts themselves from our kitchen project that we bought in bulk. 

4.  Gave closet a fresh coat of paint with the same white as the walls.  I also painted the woodwork in the closet white as well.  When we moved in, all woodwork was wood so we have slowly painted everything over to white.  I am planning on keeping the door off of the closet and putting a curtain up with a tie back.  I am going to make a little reading/fort nook to the right side of the closet with a beanbag and some shelving with books. 

5.  Painted all the woodwork (windows, door, and door frames) the same white as the molding.

 One last picture of the finished product before furniture makes its appearance back in the room!

Can't wait for the next step of the project!  Let the decorating begin :)  Be back soon!!

Monday, February 4, 2013

Monday Makover- Part 2: Board and Batten is up and rolling!

What a day!  The hubby and I have been working non-stop on the little man's room since early this morning.  The hubs started putting the molding up on Saturday and it is almost complete today!  One step left of putting up a trim piece on the top, but besides that, MISSION (almost) COMPLETE!!  It's so fun watching what I envisioned in my mind come together in reality.  I am quite proud of my hubby for tackling this project.  He will be the first to tell you that he is not naturally a carpenter, but he is willing to roll up his sleeves and give anything a try.  He did an amazing job and I'm a proud wife to say the least :)

Here is the process of installing the board and batten this far:

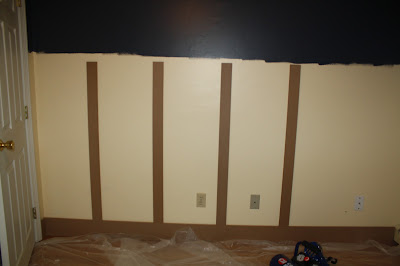
1.  Installed the base board on this last post (here).  We purchased MDF sheets in the Lumber department at Home Depot for $25 each.  It took 3 for our project with a little left over for another project.  We had Home Depot cut the  width for us and Nate cut the length himself.  This helped cut out a lot of extra time and mess.

2.  Next, came the measuring and cutting the length of the batten and upper molding.  We marked the wall where we wanted the batten and Nate used his chop saw to cut it.  The batten boards were 3 inches wide and we decided we wanted them 16 inches a part on the wall.  The top molding was cut to 5 inches wide with a 3 inch molding on top for a small shelf and a trim piece to complete the look. 

We knew we wanted to keep it the most cost effective way when installing the boards.  Since the sheets come 8 foot long, we cut the strips in half for 4 foot high batten.  The baseboard molding is 6 inches and the top molding is 5 inches with a little shelf molding on top.  That makes the height of the molding around 5 feet tall from bottom of baseboard to top of the shelf.  Here is the hubby measuring the 16 inches between the batten.  He installed the molding with his nail gun.  If you wanted extra support, you could glue in addition to nailing, because you are not guaranteed to hit a stud on every batten board.  We found that the boards were very secure in the wall with just the nail gun in our case.


 There is the 5 inch molding being installed on top of the batten.


3.  Used wood filler to fill in the seems of the wood on each batten and the corners where the top molding met up.  We let it dry overnight and then sanded today.  This part can be a little tricky and ours is not completely perfect and seamless but no one can tell unless you are closely examining it. 


4.  Next, after sanding, I primed all the MDF molding.  I left the wall as is because the color was so light and I knew the paint would cover it well.  Removed all the outlet covers before painting.  We are going to change the electrical out to white instead of cream so it blends in with the molding and wall.  This part will be done this week.


 Our little helper!  He has the sanding block in this picture below while styling the no pants look.  This was right after nap and he was excited and ready to help out!

5.  First coat of white paint.  We used Benjamin Moore's color "Decorators White" since that's what we used downstairs in the kitchen and I was really happy with it.  It is in the "Pottery Barn" collection at BM.  Since I didn't want to spend the price of Benjamin Moore paint I brought the color to Lowe's and they color matched it perfectly.  I bought the signature Valspar 2  in 1 primer and paint and it matches the kitchen color to a T!  Here is the first coat below.  I used a paint brush to get in the nooks and crannys and used a small 4 inch roller to roll the wall and front of molding.  The first coat had great coverage but I'm planning on doing a second coat touch up in the morning for those little spots that may have been missed.

 Here is the hubby using his nail gun to nail the top shelf onto the top molding.


 Here is a closeup of the molding.  There is a trim piece that still needs to be installed on the top in the picture below.  That will happen tomorrow hopefully! 

I will be back this week with a follow up so you can see the Board and Batten complete.  Anyone else thinking of putting this up in your home?  It's amazing what a transformation and statement it makes in a room.  The room looks completely different than it did a few days ago.  Can't wait to get the boy back in there and to decorate and accessorize it for him.  He is anxious to get back in there as well.  He kept asking us all day, "is my room ready yet?" ...Stay tuned! :)