Showing posts with label Renovation. Show all posts

Saturday, February 9, 2013

The Full Reveal Has Come...Boy's Room Is Done!

I love room transformations...and this one is by far my favorite in our home!

I am so excited for this one to be done so Eli can now enjoy it!  Thank you "Nemo" for giving us the time and incentive to finish it this week! Having a couple snow days in a row has pushed me to get the room back in order.  It is pretty much complete except for some decorative elements I still want to implement such as a curtain on the closet, new bedspread/pillows and additional art work.  I bought very little decorative items for the room...a lot of stuff I already had on hand throughout the house so I did a little shopping in my own home and tried to use Eli's things as decor:)  That's how I like to roll around here....move things around now and again and makes it feel like new!  Eli is so excited to have his new big boy room complete that he didn't even give us a problem last night before bed or before nap today.  It has such a cozy feel...I'm actually kind of jealous that he has one of the nicest rooms in the house now :)  He is one special little boy and I love that this room will grow with him and his siblings in the future.  Without further a do....welcome to Elias's room!


Side table- already owned and matches bed perfectly. Lamp- already owned.  This was in his nursery, I switched the shade out from a different lamp in the house so it would match the burlap/natural fiber in the room.

This is a copy of a second draft of the Gettysburg Address given by Abraham Lincoln.  We visited Lexington, Mass a couple years ago while my brother lived nearby in Waltham.  We went to the grounds where the battle of Lexington took place.  They had a shop with memorabilia and we bought a set of copies of the Decleration of Independence, Gettysburg address and a couple others.  We were thinking of putting them up in an office, but when I came across them recently (while cleaning out a closet) I thought they would be perfect in his room.  I love how it is copied on old vintage looking paper and the words are quite powerful.

 Recent purchase at Homegoods: Metal basket for $15.  Eli wanted it to be for his stuffed animals.  He is a stuffed animal lover!


 Below is a painting that Eli did recently.  I framed it in a frame that I already had on hand with white matting.  The shelf is one that we had that I painted blue to match the walls.  On the top (to the right) is Eli's fish, Nemo.  In the middle is a white ceramic globe on an axis and to the left is a jar full of his legos.  He has a set in his playroom but I like having something for him to play with when I'm upstairs doing things.  Plus, it's great color for decor as well :)  On first shelf is a globe he can play with that is sitting on top of his bibles, the white wicker basket is the home of some of his favorite things...tools and his camera, and to the far right is a mason jar full of his "monies" that he is saving.  On the second shelf is two wooden trucks (crane and mixer) that Nate and I painted for him before he was born.  They were part of the decor in his nursery because he had a "digger" themed room.  It was definitely appropriate since Nate works in construction with "diggers" everyday and Gampy (Nate's dad) owns Central Maine Crane.  In the middle of the second shelf is a hand painted bowl from Kenya, Africa that a friend bought me when I was young and inside the bowl are rocks from Grand Canyon and Red Rock Canyon in Arizona/Nevada (very first trip Eli went on when he was 7 weeks old in my belly :). The bottom shelf is home to some of his books and a few games that he likes to play.


 Chalkboard on the wall is a recent purchase from Christmas Tree Shops: $12.  I thought it would be great to hang his hats on and write little messages to him.  On the dresser is a rope basket that I made with a friend a while back.  We took a tin pot and hot glued thick rope around it.  Inside the basket is a fake plant from Ikea (low maintenance which I need).  In the middle is a picture of Eli when he was 4 months old, a white ceramic bowl with his binoculars in it, and a set of books with a plastic bird sitting on top.  He loves animals!


Crates are from a thrift store in Fairfield Maine.  I thought these would be great for shoes and other miscellaneous things.  Originally I was going to use them as a night stand but with the bunk beds I am unable to.  The sign at the top is one that I had been wanting to buy from Etsy but didn't want to spend the money.  Found this metal one at Christmas Tree Shops for $2.99.


Sign that we bought when we were first married and then we put it in Eli's nursery.  I wanted it to move with him because I want this to always be a part of our bedtime routine no matter how old :)

Natural bamboo blind was already here when we bought the home.  The brushed nickel curtain rod with blue glass globes on the end was given to me from my mom who had it in our home years ago.  It was in Eli's nursery but thought it would work perfectly in here.  White curtains are from Ikea and those were also in the nursery.  Since we were able to put the curtain rod right up to the ceiling, the curtains fit better in here.  I may not have to hem them as much as I thought.  The nursery has a slanted ceiling so we were unable to put the rod as high before.


I reused the white duvet from the full bed for the time being.  I would like to get matching bedding for top and bottom eventually...I just need the price to be right.  The natural linen pillow is one that I already owned and the knit blanket at the bottom is one made by our long time friend Kim who gave it to Eli for our shower.  It goes perfect in this room.  The rug is one that I bought our first year married for in our bedroom.  It's only a 4x6 so it's great for a small room and the price was amazing when I bought it 4 1/2 years ago for only $25 at Target. 


Now for Before and Afters...
 When we first bought the home.

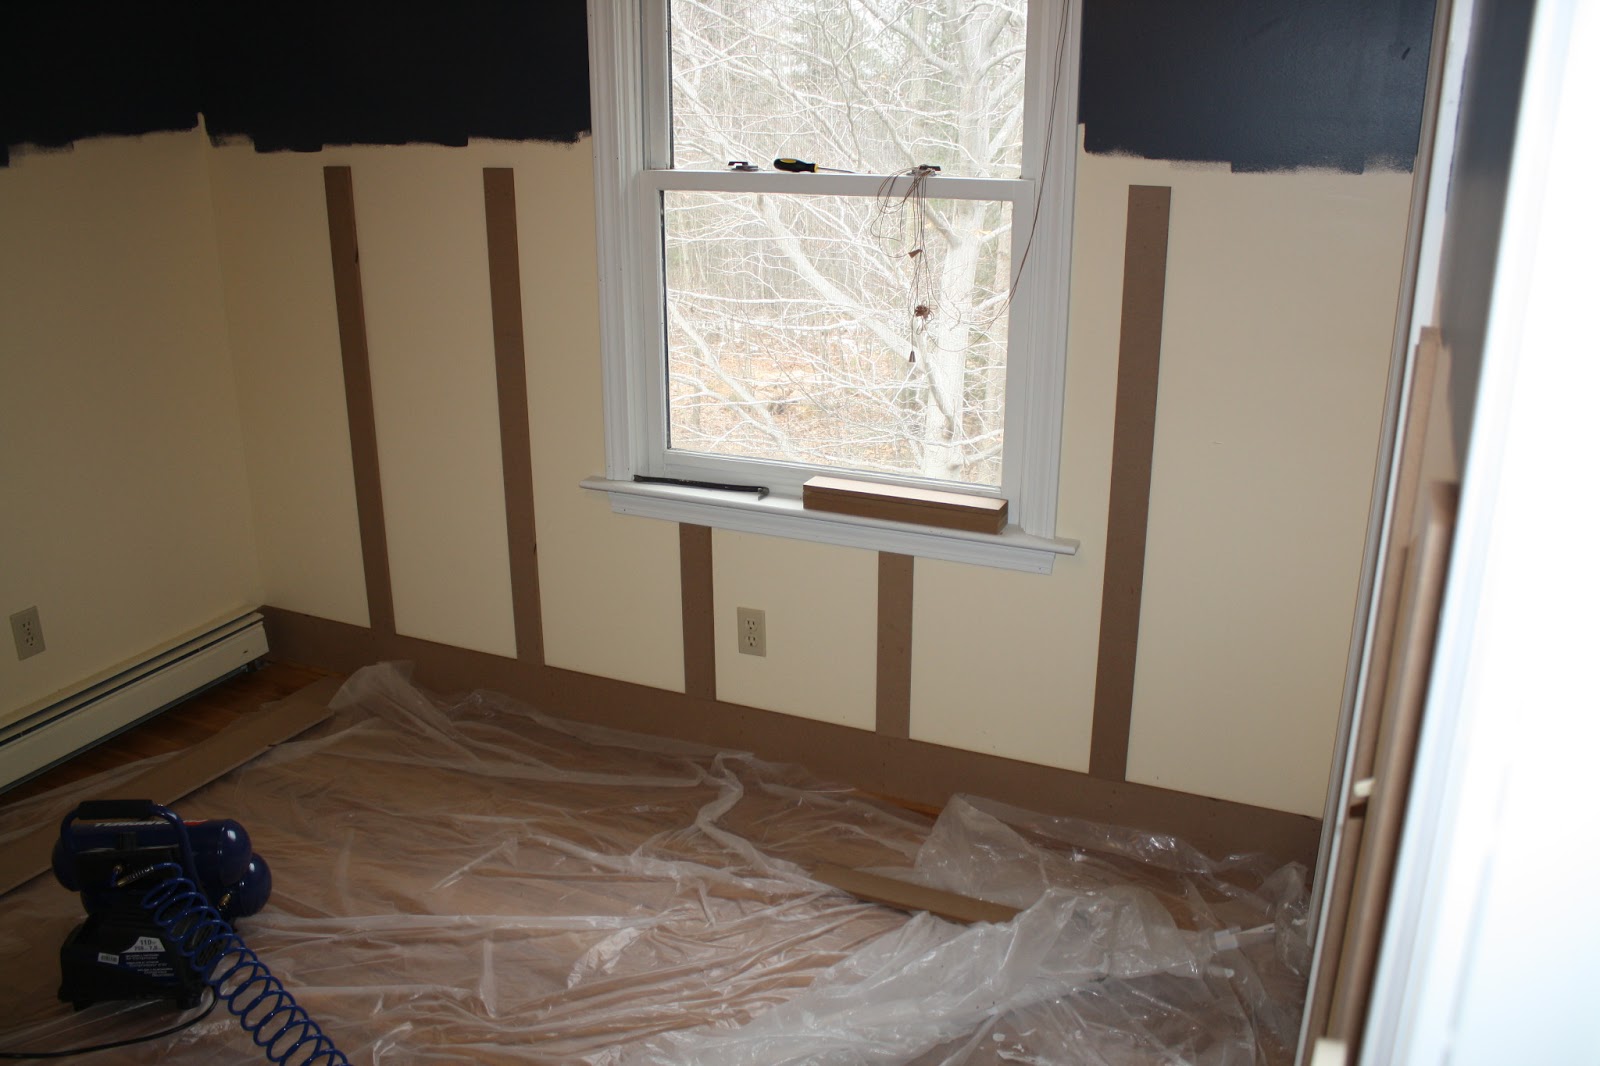
Before (how it has looked the last 2 years) and After when you first walk into the room....


Before and After to the right corner of the room...

Before and After of the closet and small wall by the door...

Thanks for stopping by our room reveal.  Any projects on your agenda this weekend?  Next up is to finish the closet with a curtain, find some organizational bins and make a little reading nook.  Happy weekend :)

Friday, February 8, 2013

Our Busy Snow Day: Bunks & Shelving!

Today was crazy outside.  Snow storm "Nemo" arrived early this morning and didn't let up much all day.  The brunt of the storm has yet to hit and should be striking here in a few hours.  I haven't seen this much snow at once as long as I can remember!  Eli is looking forward to getting out and playing in it.  I have a feeling that it may be a part of our agenda tomorrow :)  Since we were staying in for the day, we decided...why not tackle a couple projects?  And that's exactly what we did.  I re-painted a standing shelf and the hubby and I put Eli's new bed together so we could start putting the finishing touches on the room.  Of course, no project is complete without our little tag along who likes to help with EVERYTHING.  That is no exaggeration.  Whenever we have something to do or work on, he is our little shadow and on our heels the whole time.  He gets his tool box out, or uses Nate's tools and he truly thinks he's working.  The look of seriousness and accomplishment on his face is priceless and our level of patience is tested to the max, haha!  Hopefully this excitement and ambition lasts in the future!

Here is a sneak peak at the shelf I tackled today.  It was a hand me down from my dad who found it on a moving job years ago.  I inherited it when we married and it has moved from room to room throughout the last 4 1/2 years.  It recently has been chilling out in the playroom, but I decided to give it a new life and new home in Eli's room. 

First photo is the new color.  It is the same blue that is in Eli's room on the walls..."Hale Navy" Benjamin Moore.  The picture to the right is what it has looked like for many years...a creamy white color.  The blue color doesn't do justice in the lighting of the basement but will post more pics to come when we do Eli's full room reveal.  It took 3 coats to get the color that I was looking for.  It pops against the white board and batten in the room.  Can't wait to show!

We had a change of plans in the bed department for Eli's room.  We originally had planned on converting Eli's crib into a full size bed.  When we ordered the conversion rails this past week we found out they were on back order (in the color we needed) until end of April.  We didn't want to wait that long but didn't really
have any other choice because we needed the rails specific to this crib.  A while back we had thrown out the idea of bunk beds in that room in the future.  Since the room is small we thought it would make the most use of the space.  Yet, I didn't want to lose the full bed because of when we have guests over.   When we woke up this morning, Nate brought up the idea again and this time it seemed like our best option.  We would actually probably save money in the long haul and if we have a couple staying over we can sleep in Eli's room with him and our room can convert to the guest room.  Plus we will always have an extra twin bed available in Eli's room for family that stays over more often.  Problem solved!  So my crazy husband faced the storm head on and made a trip to Sam's Club this morning.  I had seen the bunk bed there a few months ago and it was almost the exact replica of one I liked at Pottery Barn but for the fraction of the cost.  It's crazy the difference in price for a piece of furniture that looks almost identical! So, he loaded up the box and mattress and
made it home within an hour of leaving our doorstep.  The color is chestnut and it's real wood which is a huge PLUS! I love how you can see the knots in the wood.  It actually matches our crib in the nursery and Eli's dresser that we bought a couple years ago.  I am in love with the dark wood against the white board and batten molding.We were probably more excited than Eli to unpack the box and get it put together.  Here is a snippet of our day putting it together as a family...


 Here is the almost finished product!  Mattresses and ladder rails to be installed!

We are so very happy with our purchase and it gives Eli a lot more room to play in there now.  When he woke up from his nap in the nursery this afternoon he told us he was ready to go back to bed because he was so excited to sleep in his new bed.  He is sleeping in it tonight and he was beyond thrilled! I am working on some finishing touches and will be back with a full room reveal by Monday.  Anyone out there have bunk beds or contemplating them?  I would recommend our purchase highly because of the price!

Enjoy your weekend and anyone in the pathway of "Nemo" stay safe!!  Speaking of "Nemo"....Eli's fish that he named Nemo made his transition into the new room as well.  He was swimming around happily, like he was giving us his stamp of approval :)


Wednesday, February 6, 2013

Board & Batten Part 3: Officially Finished!

After a long couple days of plugging away at Eli's "Big Boy" room, we are now officially finished to start moving his bed and belongings back into the space.  Before doing so, we are waiting on a bed conversion kit that we purchased this week that will convert his crib into a full size bed.  Once that arrives, we can make the final transition!  Eli and I have been doing the "happy dance" in this wide open empty space.  Not sure which one is excited more!  He keeps going into the room asking when he can move in :)

Now for the meat of this post, here are the finishing touches we did to complete the board and batten.  

1. Nate cut the shelf and trim board to fit the top of the molding.  I primed and painted the shelf before putting it up since I didn't want to have to tape off the wall and it made it much easier.   All I had to do was touch up after he nailed it on.  He made straight cuts at the corners for the shelf.  Underneath the shelf we put up a trim piece to cover the seam of the shelf against the board below it.  This really gave a finished look to the top molding.  Nate had to make angle cuts on the trim piece for the corners of the room.  He You Tubed some videos which helped him figure out how to cut it correctly.  Nate nailed the shelf up first and then glued the trim piece on.  We put painters tape up to hold it while it cured.  We found on the longer walls that we had to put a couple nails in to hold it up in addition to the glue.  Once painted over, you can't even tell!


2.  Painted a second coat on the molding and wall.  I had to do three coats on the trim up top because it was a little streaky underneath with just 2.   Also primed/painted register same color.  This took 3 coats to make it even.

 3.  Nate changed out the electrical from cream to white so it would blend in with the wall.  This took about 30 minutes total.  Inexpensive project that makes a world of difference!  Plates came in a pack, 10 for $2.99 and we already had the white electrical inserts themselves from our kitchen project that we bought in bulk. 

4.  Gave closet a fresh coat of paint with the same white as the walls.  I also painted the woodwork in the closet white as well.  When we moved in, all woodwork was wood so we have slowly painted everything over to white.  I am planning on keeping the door off of the closet and putting a curtain up with a tie back.  I am going to make a little reading/fort nook to the right side of the closet with a beanbag and some shelving with books. 

5.  Painted all the woodwork (windows, door, and door frames) the same white as the molding.

 One last picture of the finished product before furniture makes its appearance back in the room!

Can't wait for the next step of the project!  Let the decorating begin :)  Be back soon!!

Monday, February 4, 2013

Monday Makover- Part 2: Board and Batten is up and rolling!

What a day!  The hubby and I have been working non-stop on the little man's room since early this morning.  The hubs started putting the molding up on Saturday and it is almost complete today!  One step left of putting up a trim piece on the top, but besides that, MISSION (almost) COMPLETE!!  It's so fun watching what I envisioned in my mind come together in reality.  I am quite proud of my hubby for tackling this project.  He will be the first to tell you that he is not naturally a carpenter, but he is willing to roll up his sleeves and give anything a try.  He did an amazing job and I'm a proud wife to say the least :)

Here is the process of installing the board and batten this far:

1.  Installed the base board on this last post (here).  We purchased MDF sheets in the Lumber department at Home Depot for $25 each.  It took 3 for our project with a little left over for another project.  We had Home Depot cut the  width for us and Nate cut the length himself.  This helped cut out a lot of extra time and mess.

2.  Next, came the measuring and cutting the length of the batten and upper molding.  We marked the wall where we wanted the batten and Nate used his chop saw to cut it.  The batten boards were 3 inches wide and we decided we wanted them 16 inches a part on the wall.  The top molding was cut to 5 inches wide with a 3 inch molding on top for a small shelf and a trim piece to complete the look. 

We knew we wanted to keep it the most cost effective way when installing the boards.  Since the sheets come 8 foot long, we cut the strips in half for 4 foot high batten.  The baseboard molding is 6 inches and the top molding is 5 inches with a little shelf molding on top.  That makes the height of the molding around 5 feet tall from bottom of baseboard to top of the shelf.  Here is the hubby measuring the 16 inches between the batten.  He installed the molding with his nail gun.  If you wanted extra support, you could glue in addition to nailing, because you are not guaranteed to hit a stud on every batten board.  We found that the boards were very secure in the wall with just the nail gun in our case.


 There is the 5 inch molding being installed on top of the batten.


3.  Used wood filler to fill in the seems of the wood on each batten and the corners where the top molding met up.  We let it dry overnight and then sanded today.  This part can be a little tricky and ours is not completely perfect and seamless but no one can tell unless you are closely examining it. 


4.  Next, after sanding, I primed all the MDF molding.  I left the wall as is because the color was so light and I knew the paint would cover it well.  Removed all the outlet covers before painting.  We are going to change the electrical out to white instead of cream so it blends in with the molding and wall.  This part will be done this week.


 Our little helper!  He has the sanding block in this picture below while styling the no pants look.  This was right after nap and he was excited and ready to help out!

5.  First coat of white paint.  We used Benjamin Moore's color "Decorators White" since that's what we used downstairs in the kitchen and I was really happy with it.  It is in the "Pottery Barn" collection at BM.  Since I didn't want to spend the price of Benjamin Moore paint I brought the color to Lowe's and they color matched it perfectly.  I bought the signature Valspar 2  in 1 primer and paint and it matches the kitchen color to a T!  Here is the first coat below.  I used a paint brush to get in the nooks and crannys and used a small 4 inch roller to roll the wall and front of molding.  The first coat had great coverage but I'm planning on doing a second coat touch up in the morning for those little spots that may have been missed.

 Here is the hubby using his nail gun to nail the top shelf onto the top molding.


 Here is a closeup of the molding.  There is a trim piece that still needs to be installed on the top in the picture below.  That will happen tomorrow hopefully! 

I will be back this week with a follow up so you can see the Board and Batten complete.  Anyone else thinking of putting this up in your home?  It's amazing what a transformation and statement it makes in a room.  The room looks completely different than it did a few days ago.  Can't wait to get the boy back in there and to decorate and accessorize it for him.  He is anxious to get back in there as well.  He kept asking us all day, "is my room ready yet?" ...Stay tuned! :)