Wednesday, February 6, 2013

Board & Batten Part 3: Officially Finished!

After a long couple days of plugging away at Eli's "Big Boy" room, we are now officially finished to start moving his bed and belongings back into the space.  Before doing so, we are waiting on a bed conversion kit that we purchased this week that will convert his crib into a full size bed.  Once that arrives, we can make the final transition!  Eli and I have been doing the "happy dance" in this wide open empty space.  Not sure which one is excited more!  He keeps going into the room asking when he can move in :)

Now for the meat of this post, here are the finishing touches we did to complete the board and batten.  

1. Nate cut the shelf and trim board to fit the top of the molding.  I primed and painted the shelf before putting it up since I didn't want to have to tape off the wall and it made it much easier.   All I had to do was touch up after he nailed it on.  He made straight cuts at the corners for the shelf.  Underneath the shelf we put up a trim piece to cover the seam of the shelf against the board below it.  This really gave a finished look to the top molding.  Nate had to make angle cuts on the trim piece for the corners of the room.  He You Tubed some videos which helped him figure out how to cut it correctly.  Nate nailed the shelf up first and then glued the trim piece on.  We put painters tape up to hold it while it cured.  We found on the longer walls that we had to put a couple nails in to hold it up in addition to the glue.  Once painted over, you can't even tell!


2.  Painted a second coat on the molding and wall.  I had to do three coats on the trim up top because it was a little streaky underneath with just 2.   Also primed/painted register same color.  This took 3 coats to make it even.

 3.  Nate changed out the electrical from cream to white so it would blend in with the wall.  This took about 30 minutes total.  Inexpensive project that makes a world of difference!  Plates came in a pack, 10 for $2.99 and we already had the white electrical inserts themselves from our kitchen project that we bought in bulk. 

4.  Gave closet a fresh coat of paint with the same white as the walls.  I also painted the woodwork in the closet white as well.  When we moved in, all woodwork was wood so we have slowly painted everything over to white.  I am planning on keeping the door off of the closet and putting a curtain up with a tie back.  I am going to make a little reading/fort nook to the right side of the closet with a beanbag and some shelving with books. 

5.  Painted all the woodwork (windows, door, and door frames) the same white as the molding.

 One last picture of the finished product before furniture makes its appearance back in the room!

Can't wait for the next step of the project!  Let the decorating begin :)  Be back soon!!

Monday, February 4, 2013

Monday Makover- Part 2: Board and Batten is up and rolling!

What a day!  The hubby and I have been working non-stop on the little man's room since early this morning.  The hubs started putting the molding up on Saturday and it is almost complete today!  One step left of putting up a trim piece on the top, but besides that, MISSION (almost) COMPLETE!!  It's so fun watching what I envisioned in my mind come together in reality.  I am quite proud of my hubby for tackling this project.  He will be the first to tell you that he is not naturally a carpenter, but he is willing to roll up his sleeves and give anything a try.  He did an amazing job and I'm a proud wife to say the least :)

Here is the process of installing the board and batten this far:

1.  Installed the base board on this last post (here).  We purchased MDF sheets in the Lumber department at Home Depot for $25 each.  It took 3 for our project with a little left over for another project.  We had Home Depot cut the  width for us and Nate cut the length himself.  This helped cut out a lot of extra time and mess.

2.  Next, came the measuring and cutting the length of the batten and upper molding.  We marked the wall where we wanted the batten and Nate used his chop saw to cut it.  The batten boards were 3 inches wide and we decided we wanted them 16 inches a part on the wall.  The top molding was cut to 5 inches wide with a 3 inch molding on top for a small shelf and a trim piece to complete the look. 

We knew we wanted to keep it the most cost effective way when installing the boards.  Since the sheets come 8 foot long, we cut the strips in half for 4 foot high batten.  The baseboard molding is 6 inches and the top molding is 5 inches with a little shelf molding on top.  That makes the height of the molding around 5 feet tall from bottom of baseboard to top of the shelf.  Here is the hubby measuring the 16 inches between the batten.  He installed the molding with his nail gun.  If you wanted extra support, you could glue in addition to nailing, because you are not guaranteed to hit a stud on every batten board.  We found that the boards were very secure in the wall with just the nail gun in our case.


 There is the 5 inch molding being installed on top of the batten.


3.  Used wood filler to fill in the seems of the wood on each batten and the corners where the top molding met up.  We let it dry overnight and then sanded today.  This part can be a little tricky and ours is not completely perfect and seamless but no one can tell unless you are closely examining it. 


4.  Next, after sanding, I primed all the MDF molding.  I left the wall as is because the color was so light and I knew the paint would cover it well.  Removed all the outlet covers before painting.  We are going to change the electrical out to white instead of cream so it blends in with the molding and wall.  This part will be done this week.


 Our little helper!  He has the sanding block in this picture below while styling the no pants look.  This was right after nap and he was excited and ready to help out!

5.  First coat of white paint.  We used Benjamin Moore's color "Decorators White" since that's what we used downstairs in the kitchen and I was really happy with it.  It is in the "Pottery Barn" collection at BM.  Since I didn't want to spend the price of Benjamin Moore paint I brought the color to Lowe's and they color matched it perfectly.  I bought the signature Valspar 2  in 1 primer and paint and it matches the kitchen color to a T!  Here is the first coat below.  I used a paint brush to get in the nooks and crannys and used a small 4 inch roller to roll the wall and front of molding.  The first coat had great coverage but I'm planning on doing a second coat touch up in the morning for those little spots that may have been missed.

 Here is the hubby using his nail gun to nail the top shelf onto the top molding.


 Here is a closeup of the molding.  There is a trim piece that still needs to be installed on the top in the picture below.  That will happen tomorrow hopefully! 

I will be back this week with a follow up so you can see the Board and Batten complete.  Anyone else thinking of putting this up in your home?  It's amazing what a transformation and statement it makes in a room.  The room looks completely different than it did a few days ago.  Can't wait to get the boy back in there and to decorate and accessorize it for him.  He is anxious to get back in there as well.  He kept asking us all day, "is my room ready yet?" ...Stay tuned! :)

Thursday, January 31, 2013

Thrifty Thursday: Picture Re-purposed Chalkboard & Gold Liquid Leaf!

Thrifty Thursday with a Twist of a Makeover...
I am back with the full story oh how I re-purposed the frame I mentioned last week that cost me 25 cents at the Goodwill Distribution in Gorham.  Here is the before and after...


Before anyone asks why I would do away with such a classic amazing picture, it's because it was in really bad shape and the front of it was peeling, discolored and had water marks all over it.  I opted to remove it and put a new piece of wood in the frame, but I decided it was a solid base to work with and it would have been more work to do that instead.  So I ended up spraying right over the picture itself since its on an mdf type board (no glass with my picture, but I have heard of people spraying the glass with chalkboard paint and it working.  Never have done it personally however).  I love chalkboards because of their personalization.  I especially love one in the kitchen to write messages for events, quotes, scriptures or even the dinner menu for guests.   I have a small one that I made a while back, but I had been on the hunt for a larger one.  I still could go with a bigger one than this, but for 25 cents I had nothing to lose :)  Here is how my chalkboard transformation took place...

1. Covered the outside with a plastic trash bag and taped it down on the back so that I could spray the chalkboard base first.  I was a little impatient and wanted to get the ball rolling immediately when I bought the frame.  That didn't happen because you need the weather to be fairly nice so that it will dry properly and not blow all over the place when spraying.  I would love a garage someday where I can open the doors and do projects during the colder months.  Spray paint is finicky so conditions have to right.

2.  Removed the trash bag and the frame now looks like this. I did about 4 coats of chalkboard spray paint.  The backing that I sprayed wasn't completely even and was a little rough.  I sanded it a little before spraying it.  If you look at it up close you can see the unevenness but nothing that bothers me.  That's the beauty of liking an aged/vintage look because imperfections to me just bring added character to the piece :)

3.  I didn't care if the chalkboard paint got on the wood a little because I was going to spray the frame next.  I used a metallic gold spray paint from our local Ace hardware store and the Krylon chalkboard spray paint. I covered the front of the chalkboard with white paper while I sprayed the frame with the gold.


4.  I spray painted the frame with 1-2 coats of the Metallic Gold.  I was going for a vintage aged look and wanted it to have a layered effect so I didn't want the gold spray paint to be one saturated color.  I bought a gold leafing paint (similiar to gilding) that I used on top of the spray paint.  Here is the metallic gold by itself first.


5.  Next I applied the Gold Liquid Leaf with a small soft bristled paint brush.  This didn't need to be even strokes since I was going for a layered aged effect.  This product will last FOREVER (a little went a long way).  It was $5 and well worth the little "extra touch."


6.  You are supposed to wait 1 hour in between the liquid leaf coats.  I applied one coat and may do some touch ups once I have it on the wall.  I am going to wait and see what it looks like once its up in the kitchen.  I did take the brush and lightly went over the edge of the chalkboard along the frame to give it an old look.  I I had made a little boo boo and touched the chalkboard by accident with the gold liquid.  I thought I was going to have to go back with the chalkboard spray paint, but instead I decided to roll with it and make it look like it was part of the plan.  I love how the liquid leaf looks over the spray paint.  It shines/shimmers and gives it the look I was envisioning.  It compliments the mirror in our living room above the mantle very well.  They look like they could be siblings :)  Here is the finished product...


Total cost for this project:
*Frame: 25 cents
*Chalkboard spray paint: Already owned it from previous project.
*Metallic Gold Spray Paint: $4
*Gold Liquid Leaf (optional for the look I wanted): $5

Under $10.00 for this project!

This could become an obsession for me.  They are fun to make and would make great gifts!  Anyone make one recently or been wanting to?  I say GO FOR IT....its easy and simple!  Such a fun way to display notes or a message to someone in your family :)

Dear Eli...

The weather today is so strange.  It is super windy out BUT is 53 degrees on what is usually a cold, blistery January day.  I love it except it's a tease because winter isn't even half over yet. Almost all the snow is gone...it's amazing really.  I'm hoping we can take a walk and get some fresh air when you get up from nap :)

It has been quite the week....I've never laughed so much and yet at the same time I have never been so challenged and frustrated in all my life.   One moment you make me so happy and the next you are melting down and I just want to cry with you.  I hate to think of it as the "terrible twos" because I know through this time your character, personality and core values as a person are being developed and refined through all of this,  whether it's good or ugly.  You have brought me to a new level of patience and asking God to strengthen me when I know not what else to do.  It's been challenging to say the least, yet if I can get a grip on my own emotions in the midst of these trivial times, I can see a little boy trying to figure out life the best he knows how.  And my job as the parent is to guide and direct you the best I know how.  I'm learning as I go and I don't have it all figured out, but at the end of the day you know and I know that I love you so much and you mean more to me than anything in the world!  I have to remember not to wish these moments and months away because before I know it, you will be starting kindergarten and I will wonder where these last few years have gone.  In the big scheme of things, this is just a glimpse of an eye and I want nothing else than to savor this time I have with you because I will never get it back no matter how hard it is. You are worth it my son and I would have many many more if God willing because there is nothing like being a mom!

You have had me laughing so much this week.  Recently, you have started telling me that certain things "freak me out."  I'm assuming you have picked this up from me, but the funny part is that you know how to use it in the right context.  For instance, I babysit "little Eli" a couple times a week and when I went to change his poopy diaper you started to gag, running as fast as you could saying, "that stinks, it's freaking me out mommy" or the other day you were eating a salad and there was a weird looking piece of cabbage in it and you said to me, "that is gross looking, it's freaking me out", hahaha!

You are crazy sometimes and smells freak you out.  When we go into a public restroom and someone has left an "odor", you scream out, "it smells so bad in here" and you begin to cough and gag.  I feel so bad for the person you are probably insulting, but you never fail at picking up on scents when you walk into a room.  I'm just hoping you learn to filter what you are thinking as you get older :)

You love helping me cook in the kitchen.  This really tests my patience sometimes but I'm really trying to not worry about the mess so much and let you learn and have fun.  We make eggs every morning for breakfast and you are my whisker.  You tell me exactly what needs to go in it including "garlic."  Now everything we make has to have "garlic" in it according to you.  You really are great at helping me and your favorite part is trying it out along the way!  You love food and your diverse pallet is amazing!

You are my little grocery shopping buddy.  You know all the stores by heart and exactly what happens at each one.  You know Trader Joes for their little shopping carts and I think that is your favorite place to shop since you feel like a big person.  We are still working on the "excuse me" and wait for the person in front of you to go first.  You think it's like a race track and you just plow through as fast as you can.  Most people are forgiving and think you are cute and I am totally exhausted when I leave there with you!! ha!  We were at Hannaford the other night and you LOVE driving the car carts.  I love them too because it keeps you occupied and you stay put for most of the shopping trip.  When we were leaving I was putting you in the car and you kept trying to look around me.  I asked you what you were doing and you said, "i'm trying to peek at that man over there."  You were as serious as it could be with a little smile on your face.  You made me laugh so hard!

We have been really trying to work on your manners more especially when you ask a question.  You now say "may I please" or "can I please" before you do something or want to help out.  I can't even believe how much you talk now.  We can have a full on conversation with you and interact.  You love talking on the phone and you get mad at me when I answer it.  I usually have to tell the person to call back just so you can hit the button and say hello.  You are my strong, independent child and mimi says I was just like you at your age.  I think I'm getting paid back for all that I did to her :)  It's funny how much your personality resembles mine when I watch home videos.  You are not afraid to tell people where to go, what to do and how to do it and of course you have to do EVERYTHING yourself!!!!

You had your first dental cleaning this past week at Auntie Caleigh's school.  You were incredible!  You let her probe at your teeth (check for cavities), polish and fluoride them.  I was very impressed.  I am sure it helped that you know her compared to not knowing the hygienist.  You loved the stuffed alligator they had with the big chompers and large tooth brush.  You helped brush his teeth and play with Caleigh's tools :)  You have all your teeth for now and they said it all looks perfect.  As long as you keep letting me brush your teeth like you do, you should be ok :)

Well, I am sure there was a lot more said out of that little mouth of yours this week, and I'll be back to share more soon :)  There is so much you say that I need to start writing it down immediately so I don't forget.   You have such a fun personality and there is never a dull moment when you are around!

Love you so much,
Mommy

Groundhog Day is this Saturday so we made an art project today.  We have always recognized this day growing up because mimi's family lives in Punxsutawney, PA where the groundhog is from.  Our uncle was always on the groundhog committee and would dress up as the groundhog in the parade.  Here you are with your proud artwork :)


My little Picasso :)  
We are going to frame your finished product in either the playroom or your new big boy room!


Monday, January 28, 2013

Monday Makover- Part 1: Boy Room Update...Baseboards and Some Little Finds!

Goodmorning on this cold Maine morning.  Ohhhh, the beauty of living in a frigid cold state. It's about 9 degrees outside right now so I'm wrapped up in a warm blanket with a cup of coffee in hand, waiting for the house to warm up a bit, while reflecting on the blessings in our life.  Makes me appreciate the roof over our head and the little things so much more when I think about what others have to endure during seasons like this.  Thank You God for Your provision and meeting our basic needs and may those who are in need find You as their source!  Life is hard enough by itself, but to try to live it in our own strength would be brutal. I am so thankful that I can lean on the true source of life.  This old hymnal/prayer has been on auto repeat, ringing loud in my heart the past few days.  I'll leave you with this before I go into the makeover context of this post...

Praise God from whom all blessings flow;
praise him, all creatures here below;
praise him above, ye heav'ly host;
praise Father, Son, and Holy Ghost. Amen.


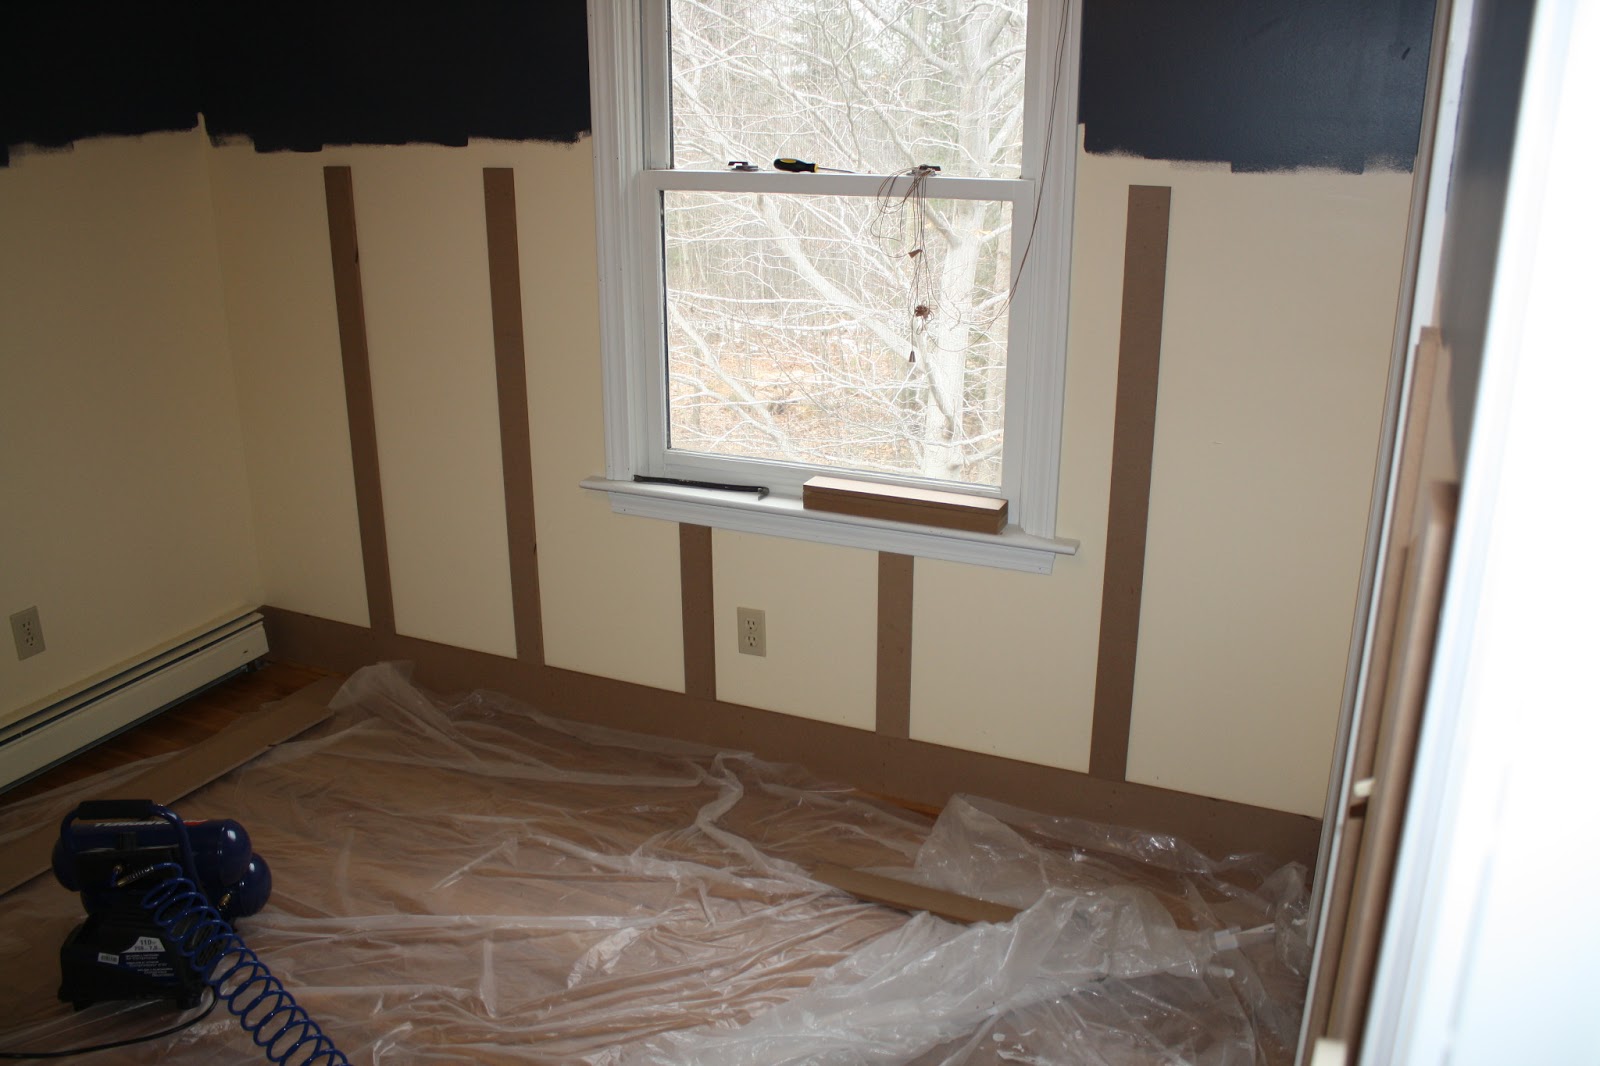
Now onto Makeover Monday.This week has been a busy one so I haven't accomplished as many projects or blogged as much as I had wanted.  We did however make a little head way in Eli's room.  We bought the molding for the wall and the hubs put up the baseboards this weekend.  We found this tutorial (here) with a great visual description on putting up "Board and Batten."  We bought 3- 8ft x 4ft MDF sheets at Home Depot.  They were $25.00 a piece and molding trim for the top was around $10-$15 (super cheap compared to using real wood.  Once primed and painted, you will never know.)  Nate had Home Depot cut the sheets to the width he needed for the baseboards and the batten molding. The baseboards were cut 6 inches wide and the batten molding was cut 3 inches wide (little wider than most batten molding, but I loved the look).   They cut the MDF for free so it was totally worth it for him because it will save him a lot of time and mess.  All he has to do is cut the length, glue, nail and install.  Easier said than done, I know:)  It's definitely simple, but the measuring and leveling will make it a little more time consuming I'm sure.  Will keep you posted as the process continues.  As for now, the baseboards are installed and here are some pictures of the finished product.

MDF molding after it was cut into strips.  Large sheet is leftover MDF that we can use for other projects.


 These are the small nail holes made with the nail gun.  Will cover those and use paintable caulk on seams once I get to the priming and painting step.  I contemplated priming and painting the baseboard before installation but I decided that I'll just put painters tape on the floor and do it all at once.
 Here are the tools used: Chop saw and nail gun/air compressor (Nate's Father's Day gift this past year and it has come in handy a lot recently!)

 The remainder of the molding will go up this week hopefully, so I will make sure to document it fully as we go along.  Can't wait to prime and paint!

As for me this past weekend, I made a trip to Christmas Tree Shop.  I haven't been there in months so I was looking forward to a girls date there with my mom and sister.  I knew going in I was on a hunt for one mission: Eli's room.  I found a few miscellaneous items that I'm looking forward to using once the room is complete.  Here they are...

Gray chalkboard/shelf- $12.   The color doesn't show its true self in this picture, but it it is a gray color in person.  It has an old/aged look to the stain where it is distressed along the edges.  I thought this would be great to hang his baseball hats and other clothing items on and use it as a message board.
 I LOVE signs like these and I was so excited when I found this at the bottom of a rack.  I had seen this particular saying online a while back and wanted to implement it either in the playroom or his bedroom.  It was meant to be and was only $2.99!  It's a metal sign with gray distressed stain along the edges.
 Since we are doing a "Discovery" room (which can grown with his interests through the years), I thought it would be fun to incorporate maps and globes into the mix.  Here is a plastic globe that is the perfect size that he can put on a shelf and take off to play with. It originally came on a stand so it was tilted on an axis but it was the last one left and didn't have its stand.  I was able to buy it for $1.00.  Such a great learning tool and decor at the same time!
 This globe below is white ceramic and the continents are lightly etched on it.  I love this for display purposes only and could not pass it up for only $2.50.  Thought it would pop out and look awesome on a shelf against the navy blue wall.  Love finding unexpected things like this that are inexpensive and pull all the little details together. 

Hopefully within the next 2 weeks we will have the shell of the room completed so Eli can move back into his room.  Will keep the updates coming as things progress.  Any kid makeovers going on in your world?  I need to find some organizational storage that is functional yet cute.  Hoping to make an IKEA trip soon...that place is amazing and is a must see if you have not been!  Be back soon!